


Picobello Premium Repair Set: repair all types of timber/wooden surfaces
Specifications
| Returns Accepted | ReturnsNotAccepted |
| Material | Timber |
| MPN | 4250952400007 |
| Room | Any Room |
| Brand | Picobello |
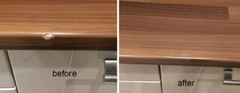
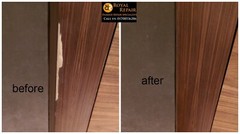
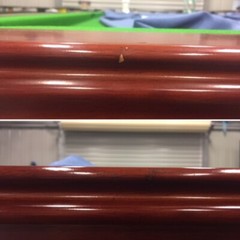
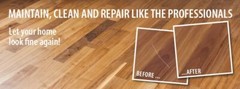
The Premium Repair Kit for all wood or laminate flooring, furniture and cabinets. The Kit is ideal for repairing chips, scratches and other types of cosmetic damage to items such as furniture, laminate or wood flooring and kitchen cabinets or counter-tops. The filler is colourfast, moisture resistant and will not shrink. To be used: Deep ScratchesPressure marksSmall holesDamaged edgesChips On surfaces and/or materials: Wood windows, indoorWood doors, indoorWood flooring, lacqueredLaminate flooringPlastic surfacesLaminate surfacesWood surfaces, lacqueredCork flooringKitchen cabinet and counter-topsWork topsContents: 15 Sticks of Hard-wax (assorted wood shades, black, white and transparent) 1 x Special Applicator 1 x Battery Operated Melting Iron. 3 Batteries 1 x Sanding and Polishing Pad 1 x Lint Free Cotton Cloth 1 x AQUA Clear Lacquer Brush Pen: Gloss 1 x Instruction GuideIt‘s just so easy … Preparation: The area to be repaired has to be clean, dry and free from grease. If necessary, remove any loose or sticking out particles. Choose Colours: Choose matching colours. Take care to apply always several colours from light to dark. With real wood surfaces, always mix colours with Transparent (900) to achieve a depth effect. Melting an Mixing: Activate the melter – the melter tip heats immediately. Melt off small portions of filler and mix together. Filling: Let wax mixture flow into the damage area. Note: Always slightly overfill the area! Levelling: Use the sharp grooves of the Special Fillers Applicator to strip off excess material. Precise Adjustment: For precise adjustment, imitate the grain pattern with a darker hue of filler. Then again, level off excess material with the planer grooves. Degreasing: Use the grey sanding pad to degrease the area. At the same time the gloss sheen of the repair is flattened. Sealing: To protect the repaired area, apply a sealing with the AQUA Brush Pen Clear Lacquer.Apply the lacquer evenly in one direction to the repaired area. If possible, do not apply lacquer to the surroundings. If lacquer flow decreases, again squeeze area marked “P/PRESS” and slightly dab brush tip on the Cotton Cloth. After use, wash out brush tip with water and dab dry on a cloth. Sheen Level Adjustment: When the repaired area is dry (after approx. 10-15 minutes at room temperature), the sheen level can be adjusted with the Sanding and Polishing Cloth. The green side of the cloth polishes while the white side reduces the sheen level.
Related Items